Recently I needed to store a JPEG file in a Unicode UTF16 string. In UTF8 or ASCII, this is a trivial problem - use base64 encoding. But base64 encoding, which is 75% efficient for a single or multibyte character set, drops to 37.5% efficiency with double bytes - which means that the storage required for my JPEG data would almost triple. Since I had to store potentially thousands of images in memory simultaneously, this was a problem.
I ran across a great blog entry by Markus Scherer about a technique called Base16k. This seemed to be exactly what I needed, so I translated the JavaScript sample code into C++.
Note that this technique is designed particularly for UTF16. You will lose the efficiency if you write it to a file as UTF8. If you use UTF8, then don't use Base16k. Use base64 instead.
You can download the source code and sample project from:
Tuesday, November 29, 2011


Friday, October 28, 2011
Convert a Locale Name to LCID in C++
I've spent most of the afternoon today figuring out how to convert a locale name, such as "en-US", into a locale identifier (LCID). Locale names are also called RFC 1766 language codes, or ISO 639 language names. As it turns out, this is easy to with the function LocaleNameToLCID(), but this function does not exist in Windows XP.
Microsoft provides a redistributable library that adds this functionality for XP, but it's 2MB and yet another module to install. Since my entire installation is 4MB, this isn't an option for me. You can read about that library in the article Mapping Locale Data on Downlevel Systems. In that article, they discuss the function DownlevelLocaleNameToLCID().
For handy reference, Microsoft provides a list of Language Identifier Constants and Strings on MSDN.
If you then need to convert the LCID to a CODEPAGEID, you can use this call to retrieve the code page for a particular LCID:
Additional information on this topic can be found on The Old New Thing blog, including a discussion of using the MLang library.
Microsoft provides a redistributable library that adds this functionality for XP, but it's 2MB and yet another module to install. Since my entire installation is 4MB, this isn't an option for me. You can read about that library in the article Mapping Locale Data on Downlevel Systems. In that article, they discuss the function DownlevelLocaleNameToLCID().
For handy reference, Microsoft provides a list of Language Identifier Constants and Strings on MSDN.
If you then need to convert the LCID to a CODEPAGEID, you can use this call to retrieve the code page for a particular LCID:
GetLocaleInfo(lcid, LOCALE_IDEFAULTCODEPAGE, ...)
Additional information on this topic can be found on The Old New Thing blog, including a discussion of using the MLang library.
// This is a version of LocaleNameToLCID() that works on Windows XP.
// On Windows Vista or later, it automatically delegates to the
// built-in version of LocaleNameToLCID().
// This function is not case-sensitive.
// Tested with Unicode builds only, not tested under ANSI builds, but should be pretty close.
// Example value for szLocale is "en-US"
LCID CompatibleLocaleNameToLCID(LPCSTR szLocale)
{
CString strValue(szLocale);
CStringW wstrValue(strValue);
static bool bDone;
LCID (WINAPI * pfnLocaleNameToLCID)(LPCWSTR, DWORD);
if (!bDone)
{
bDone = true ;
*(FARPROC*)&pfnLocaleNameToLCID = ::GetProcAddress(GetModuleHandleA("Kernel32" ), "LocaleNameToLCID" );
}
if (pfnLocaleNameToLCID)
return LocaleNameToLCID(wstrValue, 0);
CComPtr<IMultiLanguage> iLang;
HRESULT hr = iLang.CoCreateInstance(CLSID_CMultiLanguage);
LCID lcid;
if (SUCCEEDED(hr) && SUCCEEDED(iLang->GetLcidFromRfc1766(&lcid, (BSTR)wstrValue.GetString()))) {
return lcid;
}
return LOCALE_USER_DEFAULT;
}
Tuesday, October 25, 2011
Reading XML from C++
Reading XML from a URL is easy with by MSXML::IXMLHttpRequest.
Sample code is available at:
http://msdn.microsoft.com/en-us/library/ms992615(v=exchg.65).aspx
However, there are some disadvantages to this interface, which does not give you access to the low level handles if you need to tweak anything. For example, some servers require you to authenticate with a certificate and IXMLHttpRequest provides no way to do this. This interface will also display errors to the user and prompt for required information, so it's not appropriate for an application that will run silently.
Therefore, Microsoft provides a second interface called IServerXMLHTTPRequesthttp://msdn.microsoft.com/en-us/library/windows/desktop/ms762278(v=VS.85).aspx. This interface inherits from IXMLHttpRequest, but it does not use WinInet and so is appropriate for use in servers. It also allows you to explicitly provide a certificate using SXH_OPTION_SELECT_CLIENT_SSL_CERT.
Sample code is available at:
http://msdn.microsoft.com/en-us/library/ms992615(v=exchg.65).aspx
However, there are some disadvantages to this interface, which does not give you access to the low level handles if you need to tweak anything. For example, some servers require you to authenticate with a certificate and IXMLHttpRequest provides no way to do this. This interface will also display errors to the user and prompt for required information, so it's not appropriate for an application that will run silently.
Therefore, Microsoft provides a second interface called IServerXMLHTTPRequesthttp://msdn.microsoft.com/en-us/library/windows/desktop/ms762278(v=VS.85).aspx. This interface inherits from IXMLHttpRequest, but it does not use WinInet and so is appropriate for use in servers. It also allows you to explicitly provide a certificate using SXH_OPTION_SELECT_CLIENT_SSL_CERT.
Tuesday, September 20, 2011
Google C++ Style Guide
I've authored at least a couple of C++ style guides for companies over the years. Therefore, it was very interesting today for me to see Google's C++ style guide:
http://google-styleguide.googlecode.com/svn/trunk/cppguide.xml
One point I saw that was interesting is Exceptions, where it says, "We do not use C++ exceptions." I find this interesting considering that some popular libraries (notably STL) do use exceptions - whether you like it or not. If you don't have exception handling, nasty things happen when things go wrong. I discuss one such debugging nightmare in an earlier blog post:
http://qualapps.blogspot.com/2009/11/handling-exceptions-from-stl.html
http://google-styleguide.googlecode.com/svn/trunk/cppguide.xml
One point I saw that was interesting is Exceptions, where it says, "We do not use C++ exceptions." I find this interesting considering that some popular libraries (notably STL) do use exceptions - whether you like it or not. If you don't have exception handling, nasty things happen when things go wrong. I discuss one such debugging nightmare in an earlier blog post:
http://qualapps.blogspot.com/2009/11/handling-exceptions-from-stl.html
Wednesday, January 19, 2011
Display Unicode in a Windows console window with printf/wprintf
Did you know that you can print Unicode to a console window under Windows? I didn't. Here are some blog entries that discuss how to do it. You need Visual Studio 2005 or later to display Unicode using the C run-time library. Thanks to Microsoft C++ MVPs Jochen Kalmbach and Igor Tandetnik for introducing me to these solutions:
http://blog.kalmbachnet.de/?postid=98
https://archives.miloush.net/michkap/archive/2010/10/07/10072032.html
https://archives.miloush.net/michkap/archive/2008/03/18/8306597.html
http://illegalargumentexception.blogspot.com/2009/04/i18n-unicode-at-windows-command-prompt.html
With the techniques in those articles, you can display both UTF-16 and UTF-8 Unicode characters in a console window.
There are some caveats:
http://groups.google.com/group/microsoft.public.win32.programmer.international/browse_thread/thread/788eaf7082088b35
http://blog.kalmbachnet.de/?postid=98
https://archives.miloush.net/michkap/archive/2010/10/07/10072032.html
https://archives.miloush.net/michkap/archive/2008/03/18/8306597.html
http://illegalargumentexception.blogspot.com/2009/04/i18n-unicode-at-windows-command-prompt.html
With the techniques in those articles, you can display both UTF-16 and UTF-8 Unicode characters in a console window.
There are some caveats:
- The console window must be set to a TrueType font. By default it is set to a raster font, which does not support Unicode characters.
- Not all languages are supported. Lucida Console, the most common console TrueType font, will display Russian characters, but not Arabic or Hebrew.
http://groups.google.com/group/microsoft.public.win32.programmer.international/browse_thread/thread/788eaf7082088b35
Friday, January 7, 2011
How to: Debug with Code Center Premium Source (In Detail)
This article is an extensive update to the MSDN article of the same name. I saw that article two months ago and it was only with the help of Microsoft C++ MVP John Czopowik that I was able to make Windows Source Debugging work under Visual Studio 2010. I hope this article saves other people from the same frustration.
These instructions are for developers who have a Windows source code license and access to Code Center Premium.
In Virtual PC on Windows 7, go to the USB menu and select USB SmartCard Reader. You will be prompted to install the drivers in the virtual machine. The smart card will be DISCONNECTED from the host system, so you will not be able to use it in the host machine until the virtual machine releases it.
You do not need to do this if you are using Remote Debugging to run your application in the virtual machine.
The problem with " PathRemoveExtensionA" seems to be a "build feature". They implemented the file only once for A and W and then you uses this file without "A, W"... In this case, the source file is called "path.c" and is referenced as "patha.c" (A) and "pathw.c" (W).
If you want to debug into this files, you need just to copy the source from the CCP-Website for the "TCHAR" version and save it wherever you want with the name "patha.c" and/or "pathw.c". Then if VS askes you for the file, you can just use this file. It will exactly match.
It seems that this file is generated during the build-process, because it seems that it is also compiled from the output directory...
Here is the list of all currently available source server paths. Links are not clickable because these links are only for use in Visual Studio, not in your browser.
Win7 RTM: https://codepremium.msdn.microsoft.com/source/Windows%207/RTM
W2k8 RTM: https://codepremium.msdn.microsoft.com/source/Windows%20Server%202008/RTM
W2k8 Hyper-V-RTM: https://codepremium.msdn.microsoft.com/source/Windows%20Server%202008/Hyper-V%20RTM
W2k8 SP2: https://codepremium.msdn.microsoft.com/source/Windows%20Server%202008/SP2
W2k8 R2: https://codepremium.msdn.microsoft.com/source/Windows%20Server%202008/R2
W2k3 RTM: https://codepremium.msdn.microsoft.com/source/Windows%20Server%202003/RTM
W2k3 R2: https://codepremium.msdn.microsoft.com/source/Windows%20Server%202003/Windows%20Server%202003%20R2
W2k3 SP1: https://codepremium.msdn.microsoft.com/source/Windows%20Server%202003/Windows%20Server%202003%20SP1%20RTM
W2k3 SP2 RC: https://codepremium.msdn.microsoft.com/source/Windows%20Server%202003/Windows%20Server%202003%20SP2%20RC
W2k3 SP2: https://codepremium.msdn.microsoft.com/source/Windows%20Server%202003/Windows%20Server%202003%20SP2%20RTM
Vista Beta1: https://codepremium.msdn.microsoft.com/source/Windows%20Vista/Beta%201
Vista Beta2: https://codepremium.msdn.microsoft.com/source/Windows%20Vista/Beta%202
Vista RC1: https://codepremium.msdn.microsoft.com/source/Windows%20Vista/RC1
Vista RTM: https://codepremium.msdn.microsoft.com/source/Windows%20Vista/RTM
Vista SP1: https://codepremium.msdn.microsoft.com/source/Windows%20Vista/SP1
Vista SP2: https://codepremium.msdn.microsoft.com/source/Windows%20Vista/SP2
XP RTM: https://codepremium.msdn.microsoft.com/source/windows%20XP/RTM
XP SP1: https://codepremium.msdn.microsoft.com/source/windows%20XP/SP1
XP SP2: https://codepremium.msdn.microsoft.com/source/windows%20XP/SP2
XP SP3: https://codepremium.msdn.microsoft.com/source/windows%20XP/SP3
XP 64-bit: Not available.
W2k Datacenter RTM: https://codepremium.msdn.microsoft.com/source/Windows%202000/Datacenter%20RTM
W2k SP3: https://codepremium.msdn.microsoft.com/source/Windows%202000/SP3
W2k SP4: https://codepremium.msdn.microsoft.com/source/Windows%202000/SP4
These instructions are for developers who have a Windows source code license and access to Code Center Premium.
To prepare for debugging with Code Center Premium
- Close all copies of Visual Studio that are running (this is required or VS will overwrite your registry changes.)
- Connect your SmartCard reader and insert the card you obtained from the Shared Source Initiative.
- Windows Vista and Windows 7 will need to contact Windows Update to install a Gemalto driver. Make sure that you allow this to happen. (Windows XP: See the instructions that came with the card reader.)
- Make sure your smart card certificate is working by opening Internet Explorer and going to https://codepremium.msdn.microsoft.com/. You should see prompts as shown in Steps 3 to 6 under Sample Walkthrough, below. This must work properly before you proceed with these instructions. Do not use Firefox because Firefox does not support smart card authentication!
- Open the Registry Editor and go to: HKEY_CURRENT_USER\Software\Microsoft\VisualStudio\10.0\Debugger
- Set both SecureSourceLocalDirectory and SourceServerExtractToDirectory to the same directory. The directory does not have to already exist.
- Launch Visual Studio.
- On the Tools menu, click Options.
- In the Options dialog box, open the Debugging node and click General.
- Clear the Enable just my code (Managed only) check box.
- Select Enable Enable source server support.
- Select Print source server diagnostic messages to the Output window.
- Clear Require source files to exactly match the original version.
- Under the Debugging node, click Symbols.
- In the Symbol file (.pdb) locations box, clear the Microsoft Server Symbols check box and add the following location:
https://codepremium.msdn.microsoft.com/symbols
Move this location to be second in the list to ensure that these symbols are loaded first. (You can't move it to the top. Microsoft Symbol Servers is always first, but you should have unchecked it.) Visual Studio 2005 and 2008 users: In the screen shot below, note the third entry in this list, C:\Windows\symbols\dll. This directory is where the MFC and C run-time symbols are installed by Visual Studio. These symbols are not part of Code Center, so you need to include them if you want to debug into MFC or the C run-time library. Visual Studio 2010 users: You don't need the reference to C:\Windows\symbols\dll. Visual Studio always looks there, even if it's not in this list. - In the Cache symbols in this directory box, enter a location such as C:\symbols where Code Center Premium can cache the symbols. This location should be DIFFERENT from the location used to store public symbols when Microsoft Symbol Servers is checked because symbols already downloaded from the Microsoft Symbol Servers will prevent symbols being downloaded from Code Center Premium.
- Click OK.
- Right-click the Solution under Solution Explorer and choose Properties:
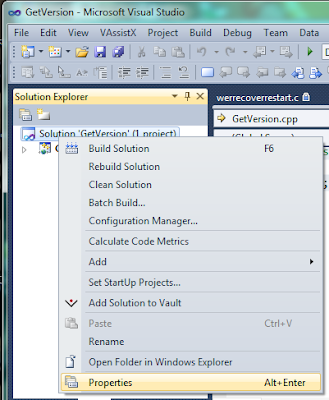
- Under Common Properties, select Debug Source Files.
- Add a link for the desired operating system (complete list at the end of this article.) For example:
https://codepremium.msdn.microsoft.com/source/Windows%207/RTM
Note that spaces must be replaced with %20, and you cannot browse to this location in your browser.

- In the same window, make sure that the list under Do not look for these source files is empty.
- Click OK.
- Close and restart Visual Studio to ensure that settings are persisted.


Sample Code
Here is sample code that I used for testing. It's a native code console application that can be tested under x86 or x64:
#include "stdafx.h"


#include <windows.h>

#include <shlwapi.h>


#pragma comment(lib, "shlwapi.lib")


int _tmain(int argc, _TCHAR* argv[])

{

  // Can't step into this function. You get a "not indexed" error.

  //char buf[256]={'\0'};

  //::PathRemoveExtensionA(buf);


  // Set a breakpoint on this function, then try to Step Into it.

  GetConsoleMode(0,0);


  // Stepping into this function should work too, but not on XP.

  //UnregisterApplicationRestart();


  return 0;

}
Sample Walkthrough
- Set a breakpoint at GetConsoleMode in the sample code.
- Start debugging (F5).
- You should see the Confirm Certificate window. If not, your smart card isn't working.
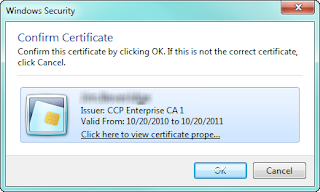
- Click OK.
- You'll be asked to enter your PIN. You received this in your email confirmation that welcomed you to Code Center Premium.
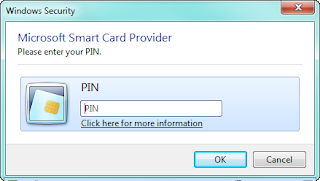
- Enter your PIN and click OK.
- It may take a while to get started because the private symbols must be downloaded. Since they contain full debug information, they are much larger than the usual symbols.
- When Visual Studio stops at the breakpoint, look at your Modules window. Here's how it appears on my Windows 7 64-bit machine: (click it to see it full size.)

- Note that kernel32.dll shows "Symbols loaded", whereas KernelBase.dll shows "Symbols loaded (source information stripped). If kernel32.dll also shows "(source information stripped)", then you are using the wrong symbols. The most likely cause is if you didn't set a different cache directory for private symbols.
- Also note that the timestamp for both kernel32.dll and KernelBase.dll is 7/13/2009. This means that they are RTM DLLs for Windows 7. The timestamp for ntdll.dll is 3/23/2010, which means that it's been updated and you can't step into it. So it is possible to debug on a patched system, but it's hit or miss because many DLLs have been patched and so can't be stepped into.
- Now you will see a window asking to execute an untrusted command named SD.EXE:
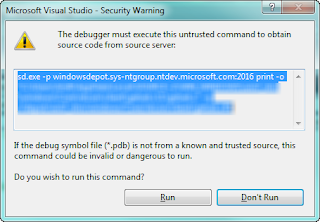
- This command will be executed by the Source Server at Code Center Premium. It will NOT be executed on your computer. You do not need to have SD.EXE on your computer.
- Click Run.
- You should now be looking at Windows source code.
- If you look at the Output window, you should see messages such as the following: (some NDA information removed.)
SRCSRV: sd.exe -p windowsdepot.sys-ntgroup.ntdev.microsoft.com:2016 print -o "C:\Users\JimB\AppData\Local\SOURCE~2\WIN_WINDOWS\win7_rtm\windows\yyy\yyy\yyy\yyy.c\1\yyy.c" -q //depot/win7_rtm/windows/Core/xxx/xxx/xxxxx.c#1


SRCSRV: Source server cannot retrieve the source code for file 'd:\w7rtm\windows\zzz\zzz\zzz\zzz.c' in module 'C:\Windows\System32\kernel32.dll'. The system cannot find the file specified. - Note that Source Server is actually showing an error. In spite of this, debugging still works properly.


Things That Don't Work
- You can't debug into 32-bit code running under a 64-bit operating system. In other words, you can't debug into any DLL that lives in \Windows\SysWOW64. (Remote debugging into a 32-bit virtual machine running under a 64-bit operating system is okay.)
- You can't debug any hot fixes, security fixes or operating system updates. You can ONLY debug the RTM release or a service pack. In practice, this usually means that you are remote debugging a virtual machine that was installed from the DVD and Windows Update has been turned off.
- You can't debug when running Visual Studio under Remote Desktop because the smart card doesn't work when you are logged in under Remote Desktop. (LogMeIn and GotoMyPC are not tested.)
- The debugger won't step into some Windows functions. This usually means that you are trying to step into a DLL that's been updated since the original release.
- Some functions are in files that Code Center Premium can't find. One example is PathRemoveExtensionA in shlwapi.dll. For files that can't be found, you'll see a "not indexed" error in your Output window:
SRCSRV: o:\w7rtm.obj.amd64fre\shell\shlwapi\srca\objfre\amd64\patha.cpp not indexed
Troubleshooting
Everything has to be exactly right for source code debugging to work properly. If things aren't working, here are some ideas:- Is your smartcard working? (Repeat Step 4 under Prepare for debugging, above.)
- Did Visual Studio overwrite your registry entries? This usually leads to the error "SRCSRV: ... The system cannot find the file specified." (Repeat Step 5.)
- Did the file get added to the list of Do not look for these source files? (See Steps 18 through 22.)
- Are you debugging a 32-bit app on 64-bit Windows? You can't debug Windows source in this case. Run the 32-bit code on a 32-bit version of Windows in a virtual machine and use Remote Debugging.
- Are you trying to step into the Windows kernel? Kernel debugging is different from user mode debugging. You must use WinDbg for kernel mode debugging.
- Is the source code missing on Code Center Premium? This would be the case if you are getting the error SRCSRV: ... not indexed. Please see the section below titled ANSI versus Unicode Functions.
- Are you seeing a warning about an "Untrusted Command"? This is normal. Just click Run.
- Can't step into a Windows API function? Make sure you have symbols for the DLL. Look in the Modules list and make sure that it does NOT say "Source information stripped." If it does, clear your symbol cache and run your app again.
Running Visual Studio in a Virtual Machine
You can install Visual Studio 2010 on your Windows 7 clean machine and run Visual Studio 2010 in the virtual machine so you don't have to use remote debugging. However, you must use a virtual machine that supports USB devices, such as VMware or Virtual PC in Windows 7. Virtual PC 2007 will not work (not even with SP1.)In Virtual PC on Windows 7, go to the USB menu and select USB SmartCard Reader. You will be prompted to install the drivers in the virtual machine. The smart card will be DISCONNECTED from the host system, so you will not be able to use it in the host machine until the virtual machine releases it.
You do not need to do this if you are using Remote Debugging to run your application in the virtual machine.
ANSI versus Unicode Functions
Debugging into the "A" and "W" versions of functions frequently doesn't work. Here is the explanation from C++ MVP Jochen Kalmbach:The problem with " PathRemoveExtensionA" seems to be a "build feature". They implemented the file only once for A and W and then you uses this file without "A, W"... In this case, the source file is called "path.c" and is referenced as "patha.c" (A) and "pathw.c" (W).
If you want to debug into this files, you need just to copy the source from the CCP-Website for the "TCHAR" version and save it wherever you want with the name "patha.c" and/or "pathw.c". Then if VS askes you for the file, you can just use this file. It will exactly match.
It seems that this file is generated during the build-process, because it seems that it is also compiled from the output directory...
Source Server Paths
(Thanks again to C++ MVP Jochen Kalmbach for providing this list.)Here is the list of all currently available source server paths. Links are not clickable because these links are only for use in Visual Studio, not in your browser.
Win7 RTM: https://codepremium.msdn.microsoft.com/source/Windows%207/RTM
W2k8 RTM: https://codepremium.msdn.microsoft.com/source/Windows%20Server%202008/RTM
W2k8 Hyper-V-RTM: https://codepremium.msdn.microsoft.com/source/Windows%20Server%202008/Hyper-V%20RTM
W2k8 SP2: https://codepremium.msdn.microsoft.com/source/Windows%20Server%202008/SP2
W2k8 R2: https://codepremium.msdn.microsoft.com/source/Windows%20Server%202008/R2
W2k3 RTM: https://codepremium.msdn.microsoft.com/source/Windows%20Server%202003/RTM
W2k3 R2: https://codepremium.msdn.microsoft.com/source/Windows%20Server%202003/Windows%20Server%202003%20R2
W2k3 SP1: https://codepremium.msdn.microsoft.com/source/Windows%20Server%202003/Windows%20Server%202003%20SP1%20RTM
W2k3 SP2 RC: https://codepremium.msdn.microsoft.com/source/Windows%20Server%202003/Windows%20Server%202003%20SP2%20RC
W2k3 SP2: https://codepremium.msdn.microsoft.com/source/Windows%20Server%202003/Windows%20Server%202003%20SP2%20RTM
Vista Beta1: https://codepremium.msdn.microsoft.com/source/Windows%20Vista/Beta%201
Vista Beta2: https://codepremium.msdn.microsoft.com/source/Windows%20Vista/Beta%202
Vista RC1: https://codepremium.msdn.microsoft.com/source/Windows%20Vista/RC1
Vista RTM: https://codepremium.msdn.microsoft.com/source/Windows%20Vista/RTM
Vista SP1: https://codepremium.msdn.microsoft.com/source/Windows%20Vista/SP1
Vista SP2: https://codepremium.msdn.microsoft.com/source/Windows%20Vista/SP2
XP RTM: https://codepremium.msdn.microsoft.com/source/windows%20XP/RTM
XP SP1: https://codepremium.msdn.microsoft.com/source/windows%20XP/SP1
XP SP2: https://codepremium.msdn.microsoft.com/source/windows%20XP/SP2
XP SP3: https://codepremium.msdn.microsoft.com/source/windows%20XP/SP3
XP 64-bit: Not available.
W2k Datacenter RTM: https://codepremium.msdn.microsoft.com/source/Windows%202000/Datacenter%20RTM
W2k SP3: https://codepremium.msdn.microsoft.com/source/Windows%202000/SP3
W2k SP4: https://codepremium.msdn.microsoft.com/source/Windows%202000/SP4
Friday, November 12, 2010
Extracting Icons with the Windows SDK
This is an article about the technical aspects of dealings with Windows Icons, including icon resources and HICON handles. But first, let me share with you how I feel about icons. I hate icons. I hate creating them. I hate working with them. I hate rendering them. I hate converting them. I hate dealing with transparency. About the only thing I like about icons is the artistry, and that's sadly lacking lately with the one and two letter icons now popularized with Adobe, Microsoft, Pandora, and Facebook. And let's not even talk about the new dark blue Visual Studio icon, that's pretty much invisible on the task bar.
Life got a little better about four years ago when I bought Axialis IconWorkshop. That's one handy piece of software, with free upgrades for life. If you are in the business of writing software, IconWorkshop will save you a lot of headaches.
But I digress.
Let me start out by pointing out the "official" documentation on icons. See the article on MSDN titled simply, Icons. Note the date of the article: 1995. Things have changed a lot in the last 15 years.
In the beginning, there were 16-color (4-bit) icons, with one color reserved for transparency, so there were really 15 colors available for use. As computers because more powerful, Microsoft introduced 256 color icons, then 24-bit truecolor icons, then 32-bit icons with 24-bit color and 8-bit transparency. Then, as a final coup-de-grace, Vista introduced 32-bit icons sized at 256x256 pixels. These took up so much space that they were stored in a completed different format (PNG). Ouch!
A good case study is the application icon for Outlook Express/Windows Mail in the file MSOERES.DLL, which has existed for most of the life of Microsoft Windows and has evolved as operating system support (and video card support) for icons has improved.
The most basic icon-handling function is LoadIcon. It loads an icon from a particular HINSTANCE whose "size conforms to the SM_CXICON and SM_CYICON system metric values." So let's say you call this function and get an icon back. What bit depth? I have no idea. Presumably the same as your desktop, but even that's a hazy concept, because your bit depth can change on the fly, especially when you start a Remote Desktop session. And there's no such thing as a 32-bit desktop - there's no transparency on your desktop. So a 32-bit icon kind of/sort of matches a 24-bit and a 16-bit desktop. But if the icon matches the bit depth of your desktop, how would the icon keep its transparency bits? Again, I don't know.
The documentation for LoadIcon says that "This function has been superseded by the LoadImage function." The LoadImage function takes the desired x and y size as parameters. That's helpful, now I can load those 256x256 bitmaps. But there's still no documentation on the bit depth.
What lead me down the path to this point is that I'm trying to extract some application icons for a web page that is being created for the local user. Those icons needs to be in PNG format to preserve transparency, so the goal was to load them from the original EXE as 32-bit icons, then save them as compressed PNG files.
Let me summarize my success for this project: Total Fail.
The first task was to get the icon for the particular file extension, such as ".doc". This problem is easy to solve and well documented - use SHGetFileInfo, which returns the HICON in either small or large (however those happen to be defined.) I spent several hours trying to convert that icon to a PNG file. The popular strategy seemed to be using OleCreatePictureIndirect, as described by DanRollins in the comments in this article and by neilsolent in this article The problem I saw was that my PNG file was always 16 colors. In later comments of that article, neilsolent said that he was seeing a similar problem, which no one was able to provide an answer to. I wasn't able to solve that problem.
Note that the algorithm offered in the initial question in that article is utterly wrong. An HICON is not an HGLOBAL and you can't access it using GlobalLock.
My fallback strategy was to just write a .ico file instead of automatically converting to a .png file. With a .ico file, converting to .png is trivial using IconWorks.
This was nowhere near as simple as I'd hoped. Remember that an icon resource contains multiple sizes and multiple bitdepths? A .ico file is really a container for manager all of those formats, and there is no Windows API for writing that file. Some documentation is given in that 1995 article I mentioned earlier, but it's a non-trivial problem to solve. There is a sample from Microsoft called IconPro (run the executable, open the .chm help file, look for IconPro, and it will give you the option to extract file sample code.) IconPro hasn't been updated in fifteen years. It knows how to write .ico files, so I was hoping that I could make some minor modifications and feed it the HICON from SHGetFileInfo. No dice. IconPro only reads the original EXE or DLL file.
No problem. I'd just retrieve to pointer to the original DLL or EXE and pass that information to the appropriate routine in IconPro.
Unfortunately, it's not that easy. In fact, it's really ugly. There's no Windows API that will automatically tell you the filename and index to retrieve an icon. SHGetFileInfo only returns an index to the system image list (aka the Icon Cache.) There's no hint of information about where the icon came from. I was surprised because I thought that this problem was simple - just look up the DefaultIcon key in the registry. Turns out that this is just one way of specifying icons. To even begin to understand the other methods, you have to delve into the shell namespace and the IExtractIcon interface. I didn't care that much.
I spent several more hours searching for a method that could take an HICON and write it to a .ico file. I found numerous other people asking this same question, but I found no answers that worked and would create a .ico file with 32-bit color depth.
At this point I gave up on an automated solution. I'll use IconWorks to manually extract the resources that I need from the relevant EXE and DLL files.
Life got a little better about four years ago when I bought Axialis IconWorkshop. That's one handy piece of software, with free upgrades for life. If you are in the business of writing software, IconWorkshop will save you a lot of headaches.
But I digress.
Let me start out by pointing out the "official" documentation on icons. See the article on MSDN titled simply, Icons. Note the date of the article: 1995. Things have changed a lot in the last 15 years.
In the beginning, there were 16-color (4-bit) icons, with one color reserved for transparency, so there were really 15 colors available for use. As computers because more powerful, Microsoft introduced 256 color icons, then 24-bit truecolor icons, then 32-bit icons with 24-bit color and 8-bit transparency. Then, as a final coup-de-grace, Vista introduced 32-bit icons sized at 256x256 pixels. These took up so much space that they were stored in a completed different format (PNG). Ouch!
A good case study is the application icon for Outlook Express/Windows Mail in the file MSOERES.DLL, which has existed for most of the life of Microsoft Windows and has evolved as operating system support (and video card support) for icons has improved.
- Vista and Windows 7: eight different sizes (256 pixel, 64, 48, 40, 32, 24, 22, 16) at three bit depths (32-bit, 8-bit and 4-bit.)
- Outlook XP SP3: three sizes (48 pixel, 32, 16) at at three bit depths (32-bit, 8-bit and 4-bit.)
- Windows 2000 SP4: three sizes (48 pixel, 32, 16) at at three bit depths (32-bit, 8-bit and 4-bit.)
- Windows 95: two sizes (32 pixel and 16 pixel) at one bit depth (4-bit.)
The only surprise for me in this list is that the Windows 2000 DLL included 32-bit icons, which would have transparency. However, that DLL was part of Service Pack 4 in 2002 and so was probably shared with Windows XP. I'm not aware that Windows 2000 was able to handle transparent icons. Also, you might wonder why I list "dead" operating systems like Windows 95. The reason is that there are some APIs that are stuck in the days of Win9x and never improved, notably the toolbar code in MFC. The common controls also behave differently depending on whether the Common Controls 6 is enabled, either explicitly or with a manifest.
Here's an important point about dealing with icons that took me quite a while to understand. First, there's an icon resource with a DLL or EXE that contains the icon in multiple sizes and multiple bit depths. On the other hand, an HICON contains only a single one of those formats. If you want a different size or a different bit depth, you need to load a new HICON.
The most basic icon-handling function is LoadIcon. It loads an icon from a particular HINSTANCE whose "size conforms to the SM_CXICON and SM_CYICON system metric values." So let's say you call this function and get an icon back. What bit depth? I have no idea. Presumably the same as your desktop, but even that's a hazy concept, because your bit depth can change on the fly, especially when you start a Remote Desktop session. And there's no such thing as a 32-bit desktop - there's no transparency on your desktop. So a 32-bit icon kind of/sort of matches a 24-bit and a 16-bit desktop. But if the icon matches the bit depth of your desktop, how would the icon keep its transparency bits? Again, I don't know.
The documentation for LoadIcon says that "This function has been superseded by the LoadImage function." The LoadImage function takes the desired x and y size as parameters. That's helpful, now I can load those 256x256 bitmaps. But there's still no documentation on the bit depth.
What lead me down the path to this point is that I'm trying to extract some application icons for a web page that is being created for the local user. Those icons needs to be in PNG format to preserve transparency, so the goal was to load them from the original EXE as 32-bit icons, then save them as compressed PNG files.
Let me summarize my success for this project: Total Fail.
The first task was to get the icon for the particular file extension, such as ".doc". This problem is easy to solve and well documented - use SHGetFileInfo, which returns the HICON in either small or large (however those happen to be defined.) I spent several hours trying to convert that icon to a PNG file. The popular strategy seemed to be using OleCreatePictureIndirect, as described by DanRollins in the comments in this article and by neilsolent in this article The problem I saw was that my PNG file was always 16 colors. In later comments of that article, neilsolent said that he was seeing a similar problem, which no one was able to provide an answer to. I wasn't able to solve that problem.
Note that the algorithm offered in the initial question in that article is utterly wrong. An HICON is not an HGLOBAL and you can't access it using GlobalLock.
My fallback strategy was to just write a .ico file instead of automatically converting to a .png file. With a .ico file, converting to .png is trivial using IconWorks.
This was nowhere near as simple as I'd hoped. Remember that an icon resource contains multiple sizes and multiple bitdepths? A .ico file is really a container for manager all of those formats, and there is no Windows API for writing that file. Some documentation is given in that 1995 article I mentioned earlier, but it's a non-trivial problem to solve. There is a sample from Microsoft called IconPro (run the executable, open the .chm help file, look for IconPro, and it will give you the option to extract file sample code.) IconPro hasn't been updated in fifteen years. It knows how to write .ico files, so I was hoping that I could make some minor modifications and feed it the HICON from SHGetFileInfo. No dice. IconPro only reads the original EXE or DLL file.
No problem. I'd just retrieve to pointer to the original DLL or EXE and pass that information to the appropriate routine in IconPro.
Unfortunately, it's not that easy. In fact, it's really ugly. There's no Windows API that will automatically tell you the filename and index to retrieve an icon. SHGetFileInfo only returns an index to the system image list (aka the Icon Cache.) There's no hint of information about where the icon came from. I was surprised because I thought that this problem was simple - just look up the DefaultIcon key in the registry. Turns out that this is just one way of specifying icons. To even begin to understand the other methods, you have to delve into the shell namespace and the IExtractIcon interface. I didn't care that much.
I spent several more hours searching for a method that could take an HICON and write it to a .ico file. I found numerous other people asking this same question, but I found no answers that worked and would create a .ico file with 32-bit color depth.
At this point I gave up on an automated solution. I'll use IconWorks to manually extract the resources that I need from the relevant EXE and DLL files.
Subscribe to:
Posts (Atom)