Friday, January 7, 2011

How to: Debug with Code Center Premium Source (In Detail)

This article is an extensive update to the MSDN article of the same name. I saw that article two months ago and it was only with the help of Microsoft C++ MVP John Czopowik that I was able to make Windows Source Debugging work under Visual Studio 2010. I hope this article saves other people from the same frustration.

These instructions are for developers who have a Windows source code license and access to Code Center Premium.

To prepare for debugging with Code Center Premium

  1. Close all copies of Visual Studio that are running (this is required or VS will overwrite your registry changes.)
  2. Connect your SmartCard reader and insert the card you obtained from the Shared Source Initiative.
  3. Windows Vista and Windows 7 will need to contact Windows Update to install a Gemalto driver. Make sure that you allow this to happen. (Windows XP: See the instructions that came with the card reader.)
  4. Make sure your smart card certificate is working by opening Internet Explorer and going to https://codepremium.msdn.microsoft.com/. You should see prompts as shown in Steps 3 to 6 under Sample Walkthrough, below. This must work properly before you proceed with these instructions. Do not use Firefox because Firefox does not support smart card authentication!
  5. Open the Registry Editor and go to: HKEY_CURRENT_USER\Software\Microsoft\VisualStudio\10.0\Debugger
  6. Set both SecureSourceLocalDirectory and SourceServerExtractToDirectory to the same directory. The directory does not have to already exist.
  7. Launch Visual Studio.
  8. On the Tools menu, click Options.
  9. In the Options dialog box, open the Debugging node and click General.
  10. Clear the Enable just my code (Managed only) check box.
  11. Select Enable Enable source server support.
  12. Select Print source server diagnostic messages to the Output window.
  13. Clear Require source files to exactly match the original version.
  14. Under the Debugging node, click Symbols.
  15. In the Symbol file (.pdb) locations box, clear the Microsoft Server Symbols check box and add the following location:

    https://codepremium.msdn.microsoft.com/symbols

    Move this location to be second in the list to ensure that these symbols are loaded first. (You can't move it to the top. Microsoft Symbol Servers is always first, but you should have unchecked it.) Visual Studio 2005 and 2008 users: In the screen shot below, note the third entry in this list, C:\Windows\symbols\dll. This directory is where the MFC and C run-time symbols are installed by Visual Studio. These symbols are not part of Code Center, so you need to include them if you want to debug into MFC or the C run-time library. Visual Studio 2010 users: You don't need the reference to C:\Windows\symbols\dll. Visual Studio always looks there, even if it's not in this list.
  16. In the Cache symbols in this directory box, enter a location such as C:\symbols where Code Center Premium can cache the symbols. This location should be DIFFERENT from the location used to store public symbols when Microsoft Symbol Servers is checked because symbols already downloaded from the Microsoft Symbol Servers will prevent symbols being downloaded from Code Center Premium.
  17. Click OK.
  18. Right-click the Solution under Solution Explorer and choose Properties:
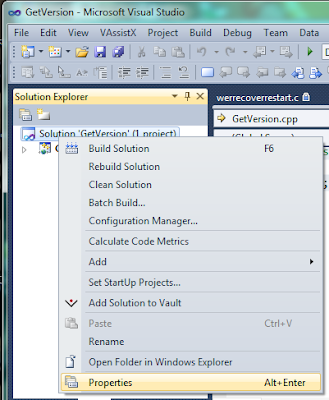
  19. Under Common Properties, select Debug Source Files.
  20. Add a link for the desired operating system (complete list at the end of this article.) For example:

    https://codepremium.msdn.microsoft.com/source/Windows%207/RTM

    Note that spaces must be replaced with %20, and you cannot browse to this location in your browser.

  21. In the same window, make sure that the list under Do not look for these source files is empty.
  22. Click OK.
  23. Close and restart Visual Studio to ensure that settings are persisted.

Sample Code

Here is sample code that I used for testing. It's a native code console application that can be tested under x86 or x64:

#include "stdafx.h"

#include <windows.h>
#include <shlwapi.h>

#pragma comment(lib, "shlwapi.lib")

int _tmain(int argc, _TCHAR* argv[])
{
  // Can't step into this function. You get a "not indexed" error.
  //char buf[256]={'\0'};
  //::PathRemoveExtensionA(buf);

  // Set a breakpoint on this function, then try to Step Into it.
  GetConsoleMode(0,0);

  // Stepping into this function should work too, but not on XP.
  //UnregisterApplicationRestart();

  return 0;
}


Sample Walkthrough

  1. Set a breakpoint at GetConsoleMode in the sample code.
  2. Start debugging (F5).
  3. You should see the Confirm Certificate window. If not, your smart card isn't working.
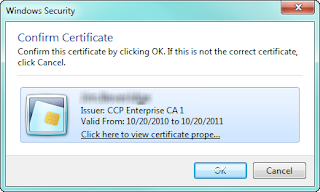
  4. Click OK.
  5. You'll be asked to enter your PIN. You received this in your email confirmation that welcomed you to Code Center Premium.
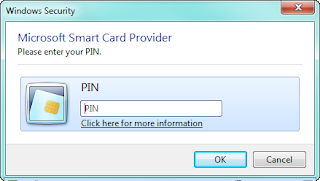
  6. Enter your PIN and click OK.
  7. It may take a while to get started because the private symbols must be downloaded. Since they contain full debug information, they are much larger than the usual symbols.
  8. When Visual Studio stops at the breakpoint, look at your Modules window. Here's how it appears on my Windows 7 64-bit machine: (click it to see it full size.)

  9. Note that kernel32.dll shows "Symbols loaded", whereas KernelBase.dll shows "Symbols loaded (source information stripped). If kernel32.dll also shows "(source information stripped)", then you are using the wrong symbols. The most likely cause is if you didn't set a different cache directory for private symbols.
  10. Also note that the timestamp for both kernel32.dll and KernelBase.dll is 7/13/2009. This means that they are RTM DLLs for Windows 7. The timestamp for ntdll.dll is 3/23/2010, which means that it's been updated and you can't step into it. So it is possible to debug on a patched system, but it's hit or miss because many DLLs have been patched and so can't be stepped into.
  11. Now you will see a window asking to execute an untrusted command named SD.EXE:
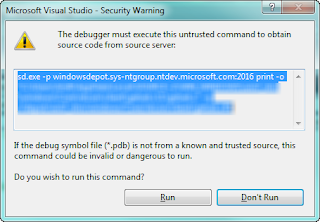
  12. This command will be executed by the Source Server at Code Center Premium. It will NOT be executed on your computer. You do not need to have SD.EXE on your computer.
  13. Click Run.
  14. You should now be looking at Windows source code.
  15. If you look at the Output window, you should see messages such as the following: (some NDA information removed.)

    SRCSRV: sd.exe -p windowsdepot.sys-ntgroup.ntdev.microsoft.com:2016 print -o "C:\Users\JimB\AppData\Local\SOURCE~2\WIN_WINDOWS\win7_rtm\windows\yyy\yyy\yyy\yyy.c\1\yyy.c" -q //depot/win7_rtm/windows/Core/xxx/xxx/xxxxx.c#1

    SRCSRV: Source server cannot retrieve the source code for file 'd:\w7rtm\windows\zzz\zzz\zzz\zzz.c' in module 'C:\Windows\System32\kernel32.dll'. The system cannot find the file specified.
  16. Note that Source Server is actually showing an error. In spite of this, debugging still works properly.

Things That Don't Work

  • You can't debug into 32-bit code running under a 64-bit operating system. In other words, you can't debug into any DLL that lives in \Windows\SysWOW64. (Remote debugging into a 32-bit virtual machine running under a 64-bit operating system is okay.)
  • You can't debug any hot fixes, security fixes or operating system updates. You can ONLY debug the RTM release or a service pack. In practice, this usually means that you are remote debugging a virtual machine that was installed from the DVD and Windows Update has been turned off.
  • You can't debug when running Visual Studio under Remote Desktop because the smart card doesn't work when you are logged in under Remote Desktop. (LogMeIn and GotoMyPC are not tested.)
  • The debugger won't step into some Windows functions. This usually means that you are trying to step into a DLL that's been updated since the original release.
  • Some functions are in files that Code Center Premium can't find. One example is PathRemoveExtensionA in shlwapi.dll. For files that can't be found, you'll see a "not indexed" error in your Output window:

    SRCSRV: o:\w7rtm.obj.amd64fre\shell\shlwapi\srca\objfre\amd64\patha.cpp not indexed

Troubleshooting

Everything has to be exactly right for source code debugging to work properly. If things aren't working, here are some ideas:
  • Is your smartcard working?  (Repeat Step 4 under Prepare for debugging, above.)
  • Did Visual Studio overwrite your registry entries? This usually leads to the error "SRCSRV: ... The system cannot find the file specified." (Repeat Step 5.)
  • Did the file get added to the list of Do not look for these source files? (See Steps 18 through 22.)
  • Are you debugging a 32-bit app on 64-bit Windows? You can't debug Windows source in this case. Run the 32-bit code on a 32-bit version of Windows in a virtual machine and use Remote Debugging.
  • Are you trying to step into the Windows kernel? Kernel debugging is different from user mode debugging. You must use WinDbg for kernel mode debugging.
  • Is the source code missing on Code Center Premium? This would be the case if you are getting the error SRCSRV: ... not indexed. Please see the section below titled ANSI versus Unicode Functions.
  • Are you seeing a warning about an "Untrusted Command"? This is normal. Just click Run.
  • Can't step into a Windows API function? Make sure you have symbols for the DLL. Look in the Modules list and make sure that it does NOT say "Source information stripped." If it does, clear your symbol cache and run your app again.

Running Visual Studio in a Virtual Machine

You can install Visual Studio 2010 on your Windows 7 clean machine and run Visual Studio 2010 in the virtual machine so you don't have to use remote debugging. However, you must use a virtual machine that supports USB devices, such as VMware or Virtual PC in Windows 7. Virtual PC 2007 will not work (not even with SP1.)

In Virtual PC on Windows 7, go to the USB menu and select USB SmartCard Reader. You will be prompted to install the drivers in the virtual machine. The smart card will be DISCONNECTED from the host system, so you will not be able to use it in the host machine until the virtual machine releases it.

You do not need to do this if you are using Remote Debugging to run your application in the virtual machine.

ANSI versus Unicode Functions

Debugging into the "A" and "W" versions of functions frequently doesn't work. Here is the explanation from C++ MVP Jochen Kalmbach:

The problem with " PathRemoveExtensionA" seems to be a "build feature". They implemented the file only once for A and W and then you uses this file without "A, W"... In this case, the source file is called "path.c" and is referenced as "patha.c" (A) and "pathw.c" (W).

If you want to debug into this files, you need just to copy the source from the CCP-Website for the "TCHAR" version and save it wherever you want with the name "patha.c" and/or "pathw.c". Then if VS askes you for the file, you can just use this file. It will exactly match.

It seems that this file is generated during the build-process, because it seems that it is also compiled from the output directory...

Source Server Paths

(Thanks again to C++ MVP Jochen Kalmbach for providing this list.)

Here is the list of all currently available source server paths. Links are not clickable because these links are only for use in Visual Studio, not in your browser.

Win7 RTM: https://codepremium.msdn.microsoft.com/source/Windows%207/RTM


W2k8 RTM: https://codepremium.msdn.microsoft.com/source/Windows%20Server%202008/RTM

W2k8 Hyper-V-RTM: https://codepremium.msdn.microsoft.com/source/Windows%20Server%202008/Hyper-V%20RTM

W2k8 SP2: https://codepremium.msdn.microsoft.com/source/Windows%20Server%202008/SP2

W2k8 R2: https://codepremium.msdn.microsoft.com/source/Windows%20Server%202008/R2


W2k3 RTM: https://codepremium.msdn.microsoft.com/source/Windows%20Server%202003/RTM

W2k3 R2: https://codepremium.msdn.microsoft.com/source/Windows%20Server%202003/Windows%20Server%202003%20R2

W2k3 SP1: https://codepremium.msdn.microsoft.com/source/Windows%20Server%202003/Windows%20Server%202003%20SP1%20RTM

W2k3 SP2 RC: https://codepremium.msdn.microsoft.com/source/Windows%20Server%202003/Windows%20Server%202003%20SP2%20RC

W2k3 SP2: https://codepremium.msdn.microsoft.com/source/Windows%20Server%202003/Windows%20Server%202003%20SP2%20RTM


Vista Beta1: https://codepremium.msdn.microsoft.com/source/Windows%20Vista/Beta%201

Vista Beta2: https://codepremium.msdn.microsoft.com/source/Windows%20Vista/Beta%202

Vista RC1: https://codepremium.msdn.microsoft.com/source/Windows%20Vista/RC1

Vista RTM: https://codepremium.msdn.microsoft.com/source/Windows%20Vista/RTM

Vista SP1: https://codepremium.msdn.microsoft.com/source/Windows%20Vista/SP1

Vista SP2: https://codepremium.msdn.microsoft.com/source/Windows%20Vista/SP2


XP RTM: https://codepremium.msdn.microsoft.com/source/windows%20XP/RTM

XP SP1: https://codepremium.msdn.microsoft.com/source/windows%20XP/SP1

XP SP2: https://codepremium.msdn.microsoft.com/source/windows%20XP/SP2

XP SP3: https://codepremium.msdn.microsoft.com/source/windows%20XP/SP3

XP 64-bit:  Not available.


W2k Datacenter RTM: https://codepremium.msdn.microsoft.com/source/Windows%202000/Datacenter%20RTM

W2k SP3: https://codepremium.msdn.microsoft.com/source/Windows%202000/SP3

W2k SP4: https://codepremium.msdn.microsoft.com/source/Windows%202000/SP4

Friday, November 12, 2010

Extracting Icons with the Windows SDK

This is an article about the technical aspects of dealings with Windows Icons, including icon resources and HICON handles. But first, let me share with you how I feel about icons. I hate icons. I hate creating them. I hate working with them. I hate rendering them. I hate converting them. I hate dealing with transparency. About the only thing I like about icons is the artistry, and that's sadly lacking lately with the one and two letter icons now popularized with Adobe, Microsoft, Pandora, and Facebook. And let's not even talk about the new dark blue Visual Studio icon, that's pretty much invisible on the task bar.
Life got a little better about four years ago when I bought Axialis IconWorkshop. That's one handy piece of software, with free upgrades for life. If you are in the business of writing software, IconWorkshop will save you a lot of headaches.

But I digress.

Let me start out by pointing out the "official" documentation on icons. See the article on MSDN titled simply, Icons. Note the date of the article: 1995. Things have changed a lot in the last 15 years.

In the beginning, there were 16-color (4-bit) icons, with one color reserved for transparency, so there were really 15 colors available for use. As computers because more powerful, Microsoft introduced 256 color icons, then 24-bit truecolor icons, then 32-bit icons with 24-bit color and 8-bit transparency. Then, as a final coup-de-grace, Vista introduced 32-bit icons sized at 256x256 pixels. These took up so much space that they were stored in a completed different format (PNG). Ouch!
 

A good case study is the application icon for Outlook Express/Windows Mail in the file MSOERES.DLL, which has existed for most of the life of Microsoft Windows and has evolved as operating system support (and video card support) for icons has improved. 
  • Vista and Windows 7: eight different sizes (256 pixel, 64, 48, 40, 32, 24, 22, 16) at three bit depths (32-bit, 8-bit and 4-bit.)
  • Outlook XP SP3: three sizes (48 pixel, 32, 16) at at three bit depths (32-bit, 8-bit and 4-bit.)
  • Windows 2000 SP4: three sizes (48 pixel, 32, 16) at at three bit depths (32-bit, 8-bit and 4-bit.)
  • Windows 95: two sizes (32 pixel and 16 pixel) at one bit depth (4-bit.)

The only surprise for me in this list is that the Windows 2000 DLL included 32-bit icons, which would have transparency. However, that DLL was part of Service Pack 4 in 2002 and so was probably shared with Windows XP. I'm not aware that Windows 2000 was able to handle transparent icons. Also, you might wonder why I list "dead" operating systems like Windows 95. The reason is that there are some APIs that are stuck in the days of Win9x and never improved, notably the toolbar code in MFC. The common controls also behave differently depending on whether the Common Controls 6 is enabled, either explicitly or with a manifest.
Here's an important point about dealing with icons that took me quite a while to understand. First, there's an icon resource with a DLL or EXE that contains the icon in multiple sizes and multiple bit depths. On the other hand, an HICON contains only a single one of those formats. If you want a different size or a different bit depth, you need to load a new HICON.

The most basic icon-handling function is LoadIcon. It loads an icon from a particular HINSTANCE whose "size conforms to the SM_CXICON and SM_CYICON system metric values." So let's say you call this function and get an icon back. What bit depth? I have no idea. Presumably the same as your desktop, but even that's a hazy concept, because your bit depth can change on the fly, especially when you start a Remote Desktop session. And there's no such thing as a 32-bit desktop - there's no transparency on your desktop. So a 32-bit icon kind of/sort of matches a 24-bit and a 16-bit desktop. But if the icon matches the bit depth of your desktop, how would the icon keep its transparency bits? Again, I don't know.

The documentation for LoadIcon says that "This function has been superseded by the LoadImage function."  The LoadImage function takes the desired x and y size as parameters. That's helpful, now I can load those 256x256 bitmaps. But there's still no documentation on the bit depth.

What lead me down the path to this point is that I'm trying to extract some application icons for a web page that is being created for the local user. Those icons needs to be in PNG format to preserve transparency, so the goal was to load them from the original EXE as 32-bit icons, then save them as compressed PNG files.

Let me summarize my success for this project: Total Fail.

The first task was to get the icon for the particular file extension, such as ".doc".  This problem is easy to solve and well documented - use SHGetFileInfo, which returns the HICON in either small or large (however those happen to be defined.) I spent several hours trying to convert that icon to a PNG file. The popular strategy seemed to be using OleCreatePictureIndirect, as described by DanRollins in the comments in this article and by neilsolent in this article The problem I saw was that my PNG file was always 16 colors. In later comments of that article, neilsolent said that he was seeing a similar problem, which no one was able to provide an answer to. I wasn't able to solve that problem.

Note that the algorithm offered in the initial question in that article is utterly wrong. An HICON is not an HGLOBAL and you can't access it using GlobalLock.


My fallback strategy was to just write a .ico file instead of automatically converting to a .png file. With a .ico file, converting to .png is trivial using IconWorks.

This was nowhere near as simple as I'd hoped. Remember that an icon resource contains multiple sizes and multiple bitdepths? A .ico file is really a container for manager all of those formats, and there is no Windows API for writing that file. Some documentation is given in that 1995 article I mentioned earlier, but it's a non-trivial problem to solve. There is a sample from Microsoft called IconPro (run the executable, open the .chm help file, look for IconPro, and it will give you the option to extract file sample code.) IconPro hasn't been updated in fifteen years. It knows how to write .ico files, so I was hoping that I could make some minor modifications and feed it the HICON from SHGetFileInfo. No dice. IconPro only reads the original EXE or DLL file.

No problem. I'd just retrieve to pointer to the original DLL or EXE and pass that information to the appropriate routine in IconPro.

Unfortunately, it's not that easy. In fact, it's really ugly. There's no Windows API that will automatically tell you the filename and index to retrieve an icon. SHGetFileInfo only returns an index to the system image list (aka the Icon Cache.) There's no hint of information about where the icon came from. I was surprised because I thought that this problem was simple - just look up the DefaultIcon key in the registry. Turns out that this is just one way of specifying icons. To even begin to understand the other methods, you have to delve into the shell namespace and the IExtractIcon interface. I didn't care that much.

I spent several more hours searching for a method that could take an HICON and write it to a .ico file. I found numerous other people asking this same question, but I found no answers that worked and would create a .ico file with 32-bit color depth.


At this point I gave up on an automated solution. I'll use IconWorks to manually extract the resources that I need from the relevant EXE and DLL files.

Tuesday, November 2, 2010

Norton Antivirus: The Clear Choice for SSDs

Today I walked up to my computer and noticed that all eight cores were pegged. I thought that was odd, since the computer should have been doing absolutely nothing. Then I noticed the "Norton Antivirus" logo in the bottom right. "Could it be?" I thought to myself.  Is there actually a consumer product on the market that is smart enough to use more than one core?!?

I tapped the keyboard, the Norton Antivirus banner disappeared, and all of the cores dropped back to idle.

I'm really impressed by this. I was trying to remember the last time I was impressed by antivirus software. I'm pretty sure the answer is "never."

Normally an antivirus application is limited by your hard drive's random access performance. Antivirus software processes files in a directory sequentially, but the files often aren't aren't laid out on the disk in that order. This means that the drive is mostly being accessed randomly, not sequentially, all of which is why it can take your antivirus software twelve hours to scan your hard drive, even with a fast hard drive and processor.

However, with an SSD, the system can maintain transfer rates in excess of 100MB/second, even with random access behavior. Crunching that much data per second is going to take more than one core, and, I'm impressed to say, Norton Antivirus appears to be up to the task.

Saturday, September 11, 2010

Lightning Fast Builds with Visual Studio 2010 and an SSD

I reduced my Visual Studio 2010 C++ build time from 21 minutes to  7  5 minutes! You can too. Here's how.

I'm a build performance junkie. If there's one thing I really hate in life, it's sitting around waiting for builds to complete. Fifteen years ago, the very first article I published was titled Speeding Up Visual C++. It was all about making Visual C++ 1.51 go faster on what was then a state of the art computer - an ISA bus Gateway DX2/50. Woo hoo! My recommendations were:
  1. Use Precompiled Headers.
  2. Upgrade to 16MB of memory.
  3. Use 4 megabytes of Disk Cache.
  4. Upgrade your Hard Drive to Fast SCSI or Enhanced IDE.
  5. Turn off Browse Info.
  6. 32 Bit File Access.
Today computers are thousands of times faster, but rotating platter disk drives are still desperately slow. The seek time of 7200RPM drives has changed very little in the last ten years, although the transfer rate for sequential files has risen dramatically. That problem, combined with Visual Studio's desire to create hundreds of .tlog temporary files, quarter gigabyte .sdf files, and project size bloat means that the average build may be even slower today than it was fifteen years ago.

Historically, your CPU would be sitting idle most of the time waiting for the hard disk to keep up. Linking performance is based almost entirely on your disk's random access read/write performance. The highly rated Western Digital Caviar Black can only perform about 100 random access IOPS (I/O Operations Per Second.) It takes multiple I/O operations per OBJ file, so a significant fraction of the link time is waiting for the hard drive to do its job.

Enter the latest generation of SSDs driven by the Sandforce Controller, such as the OCZ Vertex 2. These drives can do over 40,000 IOPS - 400 times faster than a Caviar Black. And Visual Studio 2010 build performance is phenomenal. In fact, these drives are so fast that their impact on build time is negligible. This SSD will easily hit over 50MB/sec of 4KB random writes. In contrast, the ultra-zippy 10,000 RPM VelociRaptor can only do about 3.5MB/sec. (Note that disk striping or mirroring has minimal impact on build performance because the linker isn't smart enough to use scatter/gather to force the queue depth high enough to let the command queuing on the drive work its magic.)

Now that the hard disk performance no longer matters, our next bottleneck is the CPU. You can tell your boss you need one of those monster hyper-threaded quad core i7 processors such as the 875k or, for the money-is-no-object crowd, the hyper-threaded six core 980X. Visual Studio 2010 automatically uses parallel builds. My 875k pegs all eight cores simultaneously at 100%. Compiles proceed eight files at a time and the CPUs stay pegged until the compile is finished. I've never seen a project build so fast.

The next bottleneck is probably your RAM. If you have 4GB RAM running on a 32-bit OS, you are severely limited and you probably won't be able to run eight compiles (much less 24 compiles if you are using parallel MSBuild tasks, as I explain in Part 2.) Upgrade to Windows 7 64-bit with 8GB of RAM.

So it's interesting that the types of recommendations for build performance haven't changed much. Here is my updated list:
  1. Use Precompiled Headers.
  2. Upgrade to 16MB 8GB of memory.
  3. Use 4 megabytes of Disk Cache. Upgrade to 64-bit Windows. 
  4. Upgrade your Hard Drive to Fast SCSI or Enhanced IDE a Sandforce-based SSD. 
  5. Turn off Browse Info. (This is still true. Browse Info is different than Intellisense.)
  6. 32 Bit File Access. Check your motherboard's SATA implementation. At SSD speeds, not all controllers are created equal.
In Part 2 of this article, I'll talk about how to tune your build system to keep all that hardware busy.

The system used for this article was:
  • ASUS P7P55D-E Pro motherboard.
  • Intel 875k i7 processor.
  • OCZ Vertex 2 120GB SSD.
  • 8GB RAM.
  • Thermaltake MUX-120 heatsink.
Do not use the SATA 3 Marvell controller on the ASUS motherboard. The standard ICH10 controller is much faster with SSDs.

The prior system that took 21 minutes was a Core 2 Duo 2.4 GHz with ASUS P5B Deluxe and Caviar Black 750GB hard drive.

Project is permanently out of date

I've seen several cases with Visual Studio 2010 and later where my project would be permanently "out of date." I'd build the project, run it, and would immediately be told that my project was out of date. Solving this through trial and error is tedious at best. This problem commonly is caused by two different problems:

Missing file in project

The most common cause is a file that's in your project that you've deleted from the disk. These are easy to find in smaller projects by just looking through the project for a file with an X next to it. If you can't find the file causing the problem, enable detailed Diagnostic output in MSBuild. In Visual Studio, open Tools | Options, select Projects and Solutions | Build and Run, and set MSBuild project build output verbosity to Detailed.

Alternatively, here's a handy Python script that will examine a .vcxproj file and look for any missing files:
http://stackoverflow.com/questions/2762930/vs2010-always-thinks-project-is-out-of-date-but-nothing-has-changed

I've also seen this problem when I renamed a file. The old filename is still embedded in the compiler's temporary files, even though the name no longer appears in the project. The solution is to delete all intermediate files in the project and rebuild.

Project upgraded from earlier version of Visual Studio

The StackOverflow page above also details a bug where MSBuild says, "Forcing rebuild of all source files due to a change in the command line since the last build."

The most likely cause is if you used /MP in the Additional Options box in project Properties | Configuration Properties | C/C++ | Command Line. This was often done in Visual Studio 2005. My project started building properly after I fixed this (although it was tricky, because I had set /MP1 on certain files due to bugs in multiprocessor support in VC2005.) This tip came from https://social.msdn.microsoft.com/Forums/vstudio/en-US/aca632fa-e1e0-4511-aa03-a309ae547a5b/how-to-see-the-command-line-forcing-rebuild-of-all-source-files-due-to-a-change-in-the-command?forum=msbuild.

The next problem I saw in the MSBuild log was the use of an old PDB filename. I was using Visual Studio 2013, which uses vc120.pdb. However, some of my project files used the name vc80.pdb, which was the wrong name and so was never found. In the property page for the project, set it to look something like this: (the part in bold is what you see after you set the value for the first time. The next time you reopen the page, it will show you the value that the compiler will use.)


Unhelpful recommendations

After enabling Detailed output for MSBuild, I saw this error. It didn't appear to affect the problem, but it should probably be fixed to prevent confusion in the future:
Project file contains ToolsVersion="4.0". This toolset may be unknown or missing, in which case you may be able to resolve this by installing the appropriate version of MSBuild, or the build may have been forced to a particular ToolsVersion for policy reasons. Treating the project as if it had ToolsVersion="12.0". For more information, please see http://go.microsoft.com/fwlink/?LinkId=293424.

Another suggestion which didn't work was that intermediate directories use a relative path. but I use an absolute path in my project and it works fine:
https://social.msdn.microsoft.com/Forums/vstudio/en-US/36df2f40-f6d4-4123-8261-88394790f29e/project-always-needs-complete-rebuild-in-vs-2010?forum=vcgeneral

Sunday, September 5, 2010

Fixing Permissions on an External Hard Drive

Today I pulled a hard drive from my old computer and hooked it up to my new computer, planning to move the data to the new drive and then use the old drive as a backup disk. Mostly this plan worked well, except that I wasn't allowed to delete many files and folders, even though I was an Administrator. Curious.

The problem turned out to be that I was on a workgroup, not a domain, and so the systems didn't have any common notion of "Administrator". Although Explorer knows how to request elevated permissions, this still isn't enough. You have to "Take Ownership" of the files in order to delete them, and there's no way to do this from Explorer.

I found a solution in the winmatrix forum, but it only works for files, not directories. You can't set the Full Control permission on a directory, so you end up being locked out of directories if you try and use these commands:

takeown /f filepath /r
icacls filepath /grant yourusername:f /t


(I've added /r and /t to the commands, which is required for the them to operate recursively.)

Instead, I did the steps below. These steps assume that the new drive is on E:.
  1. Open a Command Prompt with Run As Administrator.
  2. Run this command: takeown /f e:\ /r
  3. Right-Click on the root of the copied drive.
  4. Select Properties.
  5. Click the Security tab.
  6. Click the Edit button.
  7. Select Authenticated Users.
  8. Click the checkbox under Allow for Full Control.
  9. Run this command: icacls e:\*.* /reset /t
    This command will force all permissions to mirror the permissions on the root of the drive that you set in #6. You must have the *.* or the root directory will be reset, which you don't want.
After these commands completed, I was able to delete all of the desired files. Executing these commands can take quite a while if you have many files on your disk.

Friday, September 3, 2010

Windows 7 Network Performance

A few years back, after I installed Vista, I spent quite a bit of time trying to fix my GigE Ethernet performance with Windows Vista talking to Windows Server 2003 R2. My file copy performance hovered around 15 to 18 MB/sec, which was pretty dismal.

I've just built myself a new PC with a Core i7 CPU and Windows 7. I tried copying a file from the old Vista box (Core 2 Duo 2.4GHz on ASUS P5B Deluxe mobo) to the new Windows 7 box. The copy performance over the Ethernet went straight up to 50MB/sec! This was with a single WD Caviar Black drive on the Vista system, no RAID or striping.

When I tried copying from a Windows Server 2008 R2 system to the new Windows 7 system, I peaked at 112MB/sec for data that was cached, then backed off to 50 MB/sec for data that wasn't cached. Windows Server 2008 R2 was installed on the same hardware that used to be running Windows Server 2003 R2, so the performance increase was solely due to the OS upgrade.

I'm seeing similar performance gains over the internet. Talking to our corporate server from the Vista system, I maxed out at 1.5 MB/s.  Under Windows 7 with i7, I'm able to max out the connection at 5 MB/s.

All of this leads me to believe that the GigE networking performance of Windows Server 2003 R2 was awful, given that I'm running Windows Server 2008 R2 on the exact same hardware with a 5x performance increase.

Net result: (no pun intended) I'm very happy with Windows 7.